Saturday 26 January 2019

Types of Xpath


There are 3 types of xpaths:

1. Absolute xpath
2. Relative xpath
3. Partial xpath

Let us go through each one of them one by one:

1.    Absolute xpath: It uses complete path from the root element to the desired element.The key characteristic of Absolute XPath is that it begins with the single forward slash(/,which means you can select the element from the root node and the root node for any web page is 'html' always.

Absolute xpaths are very fragile and are not used widely since in order to reach a particular node you have to traverse from the beginning till the required node. If at any further point in time extra web elements are added on the page then the absolute xpath that was created becomes invalid.


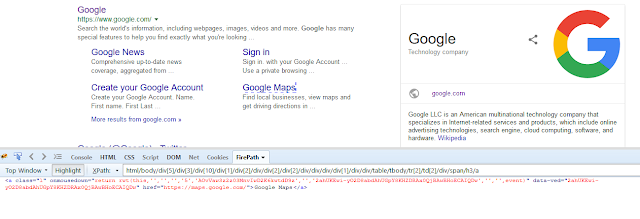
Below is an example of absolute xpath that can be directly copied by using firepath plugin in Mozilla web browser.


In the above snap we can see that the xpath for Google maps starts from the tag html-this is the root node, which indicates the beginning of the DOM structure. From html we navigate down to google maps node by node.

2.   Relative Xpath:

As we have seen in the above Google maps example, the absolute xpath that is generated is very lengthy and there are high chances that this xpath would vary with every release due to addition or removal of UI elements. To avoid frequent occurrence of 'No such element found' error we can use relative xpaths.
Relative xpath searches for matching element anywhere in the HTML DOM.

It starts with a double slash(//) which indicates to search an element anywhere on the HTML DOM.

Basic syntax for this is:

//tagname[@attribute_name='attribute_value']

3.    Partial Xpath(Dynamic xpath):
     Dynamic/Custom xpaths are used to narrow down the matching nodes which helps to efficiently identify web elements.
      They are also used to create xpaths of webelemnts that change each time when a webpage loads.


      There are various ways in which we can create dynamic xpaths which will be explained one by one below:


1.Using contains() and starts with()

2.Using AND and OR conditions
3.Using multiple attributes
4.Using Siblings
5.Using Ancestors


1.Using contains() and starts-with():

These functions can be used in the below situations:

  •     When the HTML properties/attributes are not very clear for any webelement.
  •     When we want to create a list of elements having same partial value
  •     When the values of attributes are dynamic

Syntax for contains:
  •     By text-//tagname[contains(text(),'anytext')]
  •     //tagname[contains(.,'text')]
Consider below example,xpath for 'Create an account' text is created using contains function


In the above xpath '.' can be replaced by text() method.The only difference is
Eg. //span[contains(text(),'Create an account')]


By Attribute:

//tagname[contains(@attribute_name,'attributevalue')]

Let us look at the below example where we have created an xpath for title 'facebook' using partial attribute name.
If sometimes the html attributes are not very clear as in below example then we can use partial attribute name using contains().


Using starts-with()

  • Similar to contains(),starts-with() function can be used to create partial xpaths. In situations where the attribute values are not clear starts with can be used.For eg.
In the below example the value of attribute class is a bit since there is a space between the 2 words,hence we can use starts-with function here


2.Using AND and OR conditions
In OR expression, two conditions are used, whether 1st condition OR 2nd condition should be true. It is also applicable if any one condition is true or maybe both. Means any one condition should be true to find the element.
In the below XPath expression, it identifies the elements whose single or both conditions are true.
Xpath=//*[@type='submit' OR @name='btnReset']
Highlighting both elements as "LOGIN " element having attribute 'type' and "RESET" element having attribute 'name'.
Similarly AND condition can also be used that combines 2 attributes:
Below is an xpath to identify Experience button in naukri profile:


3.Using multiple attributes:

Multiple attributes can be used to create unique xpaths.

Consider below example where in you have same class name for mutliple webelements and you need an xpath for locating Today's Deal.

Below we have created xpath using only 'class' attribute which shows that there are 7 elements on the webpage that have class name as 'nav-a'


But in order to locate Today's Deal we can take help of another attribute here which is tabindex. Creating xpath using these two attributes will give us a unique xpath.Refer below snapshot


Using xpath axes:

      XPath axis defines a node-set relative to the current node. Names of axes include       “ancestor”, “descendant”, “parent” ,following,preceding


Wednesday 23 January 2019

JSON Files in R Language

JSON file stores data as text in human-readable format. Json stands for JavaScript Object Notation. R can read JSON files using the rjson package.

Install rjson Package

In the R console, you can issue the following command to install the rjson package.
install.packages("rjson")

Input Data

Create a JSON file by copying the below data into a text editor like notepad. Save the file with a .json extension and choosing the file type as all files(*.*).
{ 
   "ID":["1","2","3","4","5","6","7","8" ],
   "Name":["Rick","Dan","Michelle","Ryan","Gary","Nina","Simon","Guru" ],
   "Salary":["623.3","515.2","611","729","843.25","578","632.8","722.5" ],


   "StartDate":[ "1/1/2012","9/23/2013","11/15/2014","5/11/2014","3/27/2015","5/21/2013",
      "7/30/2013","6/17/2014"],
   "Dept":[ "IT","Operations","IT","HR","Finance","IT","Operations","Finance"]
}

Read the JSON File

The JSON file is read by R using the function from JSON(). It is stored as a list in R.
# Load the package required to read JSON files.
library("rjson")

# Give the input file name to the function.
result <- fromJSON(file = "input.json")

# Print the result.
print(result)
When we execute the above code, it produces the following result −
$ID
[1] "1"   "2"   "3"   "4"   "5"   "6"   "7"   "8"

$Name
[1] "Rick"     "Dan"      "Michelle" "Ryan"     "Gary"     "Nina"     "Simon"    "Guru"

$Salary
[1] "623.3"  "515.2"  "611"    "729"    "843.25" "578"    "632.8"  "722.5"

$StartDate
[1] "1/1/2012"   "9/23/2013"  "11/15/2014" "5/11/2014"  "3/27/2015"  "5/21/2013"
   "7/30/2013"  "6/17/2014"

$Dept
[1] "IT"         "Operations" "IT"         "HR"         "Finance"    "IT"
   "Operations" "Finance"

Convert JSON to a Data Frame

We can convert the extracted data above to a R data frame for further analysis using the as.data.frame()function.
# Load the package required to read JSON files.
library("rjson")


# Give the input file name to the function.
result <- fromJSON(file = "input.json")

# Convert JSON file to a data frame.
json_data_frame <- as.data.frame(result)

print(json_data_frame)
When we execute the above code, it produces the following result −
      id,   name,    salary,   start_date,     dept
1      1    Rick     623.30    2012-01-01      IT
2      2    Dan      515.20    2013-09-23      Operations
3      3    Michelle 611.00    2014-11-15      IT
4      4    Ryan     729.00    2014-05-11      HR
5     NA    Gary     843.25    2015-03-27      Finance
6      6    Nina     578.00    2013-05-21      IT
7      7    Simon    632.80    2013-07-30      Operations
8      8    Guru     722.50    2014-06-17      Finance

Environment Setup in R Language

Try it Option Online

You really do not need to set up your own environment to start learning R programming language. Reason is very simple, we already have set up R Programming environment online, so that you can compile and execute all the available examples online at the same time when you are doing your theory work. This gives you confidence in what you are reading and to check the result with different options. Feel free to modify any example and execute it online.
Try the following example using Try it option at the website available at the top right corner of the below sample code box −
# Print Hello World. 
print("Hello World") 


# Add two numbers. 
print(23.9 + 11.6)
For most of the examples given in this tutorial, you will find Try it option at the website, so just make use of it and enjoy your learning.

Local Environment Setup

If you are still willing to set up your environment for R, you can follow the steps given below.

WINDOWS INSTALLATION

You can download the Windows installer version of R from R-3.2.2 for Windows (32/64 bit) and save it in a local directory.
As it is a Windows installer (.exe) with a name "R-version-win.exe". You can just double click and run the installer accepting the default settings. If your Windows is 32-bit version, it installs the 32-bit version. But if your windows is 64-bit, then it installs both the 32-bit and 64-bit versions.
After installation you can locate the icon to run the Program in a directory structure "R\R3.2.2\bin\i386\Rgui.exe" under the Windows Program Files. Clicking this icon brings up the R-GUI which is the R console to do R Programming.

LINUX INSTALLATION

R is available as a binary for many versions of Linux at the location R Binaries.
The instruction to install Linux varies from flavor to flavor. These steps are mentioned under each type of Linux version in the mentioned link. However, if you are in a hurry, then you can use yum command to install R as follows −
$ yum install R
Above command will install core functionality of R programming along with standard packages, still you need additional package, then you can launch R prompt as follows −
$ R

R version 3.2.0 (2015-04-16) -- "Full of  Ingredients"          
Copyright (C) 2015 The R Foundation for Statistical Computing
Platform: x86_64-redhat-linux-gnu (64-bit)
        
R is free software and comes with ABSOLUTELY NO WARRANTY.
You are welcome to redistribute it under certain conditions.
Type 'license()' or 'licence()' for distribution details.
            
R is a collaborative project with many  contributors.                    
Type 'contributors()' for more information and
'citation()' on how to cite R or R packages in publications.
       
Type 'demo()' for some demos, 'help()' for on-line help, or
'help.start()' for an HTML browser interface to help.
Type 'q()' to quit R.
>  
Now you can use install command at R prompt to install the required package. For example, the following command will install plotrix package which is required for 3D charts.
> install.packages("plotrix")

Popular Posts

Categories

AI (27) Android (24) AngularJS (1) Assembly Language (2) aws (17) Azure (7) BI (10) book (4) Books (115) C (77) C# (12) C++ (82) Course (62) Coursera (179) coursewra (1) Cybersecurity (22) data management (11) Data Science (91) Data Strucures (6) Deep Learning (9) Django (6) Downloads (3) edx (2) Engineering (14) Excel (13) Factorial (1) Finance (5) flutter (1) FPL (17) Google (19) Hadoop (3) HTML&CSS (46) IBM (25) IoT (1) IS (25) Java (92) Leet Code (4) Machine Learning (44) Meta (18) MICHIGAN (5) microsoft (3) Pandas (3) PHP (20) Projects (29) Python (747) Python Coding Challenge (208) Questions (2) R (70) React (6) Scripting (1) security (3) Selenium Webdriver (2) Software (17) SQL (40) UX Research (1) web application (8)

Followers

Person climbing a staircase. Learn Data Science from Scratch: online program with 21 courses