
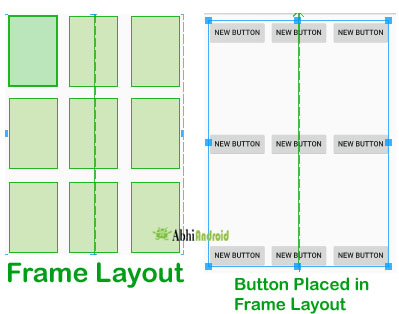
Frame Layout is one of the simplest layout to organize view controls. They are designed to block an area on the screen. Frame Layout should be used to hold child view, because it can be difficult to display single views at a specific area on the screen without overlapping each other.
We can add multiple children to a FrameLayout and control their position by assigning gravity to each child, using the android:layout_gravity attribute.
Attributes of Frame Layout:
Lets see different properties of Frame Layout which will be used while designing Android App UI:
1. android:id
This is the unique id which identifies the layout in the R.java file.
<FrameLayout xmlns:android="http://schemas.android.com/apk/res/android"
android:id="@+id/frameLayout"
android:layout_width="fill_parent"
android:layout_height="fill_parent"/>
|
2. android:foreground
Foreground defines the drawable to draw over the content and this may be a color value. Possible color values can be in the form of “#rgb”, “#argb”, “#rrggbb”, or “#aarrggbb”. This all are different color code model used.
Example: In Below example of foreground we set the green color for foreground of frameLayout so the ImageView and other child views of this layout will not be shown.
<FrameLayout xmlns:android="http://schemas.android.com/apk/res/android"
android:id="@+id/framelayout"
android:layout_width="match_parent"
android:layout_height="match_parent"
android:layout_gravity="center"
android:foregroundGravity="fill"
android:foreground="#0f0"><!--foreground color for a FrameLayout-->
<LinearLayout
android:orientation="vertical"
android:layout_width="wrap_content"
android:layout_height="wrap_content"
android:layout_centerInParent="true"
>
<!-- Imageview will not be shown because of foreground color which is drawn over it-->
<ImageView
android:layout_width="200dp"
android:layout_height="200dp"
android:layout_marginBottom="10dp"
android:src="@mipmap/ic_launcher"
android:scaleType="centerCrop"
/>
<!--Textview will not be shown because of foreground color is drawn over it-->
<TextView
android:layout_width="match_parent"
android:layout_height="wrap_content"
android:gravity="center_horizontal"
android:text="abhiAndroid"/>
</LinearLayout>
</FrameLayout>
|

Important Note: On applying android:foregroud feature, all the views taken in the framelayout will goes to the background and the framelayout comes in the foreground i.e. over the views. We can set the @drawable/image_name or the color in the foreground.
3. android:foregroundGravity
This defines the gravity to apply to the foreground drawable. Default value of gravity is fill. We can set values in the form of “top”, ”center_vertical” , ”fill_vertical”, ”center_horizontal”, ”fill_horizontal”, ”center”, ”fill”, ”clip_vertical”, ”clip_horizontal”, ”bottom”, ”left” or ”right” .
It is used to set the gravity of foreground. We can also set multiple values by using “|”. Ex: fill_horizontal|top .Both the fill_horizontal and top gravity are set to framelayout.
In the above same example of foreground we also set the foregroundGravity of FrameLayout to fill.
4. android:visibility
This determine whether to make the view visible, invisible or gone.
visible – the view is present and also visible
invisible – The view is present but not visible
gone – The view is neither present nor visible

5. android:measureAllChildren
This determines whether to measure all children including gone state visibility or just those which are in the visible or invisible state of measuring visibility. The default value of measureallchildren is false. We can set values in the form of Boolean i.e. “true” OR “false”.
This may also be a reference to a resource (in the form “@[package:]type:name“) or theme attribute (in the form “?[package:][type:]name“) containing a value of this type.
Important Note: If measureallchildren is set true then it will show actual width and height of frame layout even if the views visibility is in gone state.
The above property has been explained below:
Example of Frame layout having measureAllChildren attribute:
In the below code the ImageView visibility is set gone and measureAllChildren is set true. The output will show actual height and width the Frame Layout despite visibility is set gone. We have used Toast to display the height and width:
Below is the Code of activity_main.xml
Important Note: Make sure you have image in Drawable folder. In our case we have used ic_launcher image which we added in Drawable.
<?xml version="1.0" encoding="utf-8"?>
<FrameLayout xmlns:android="http://schemas.android.com/apk/res/android"
android:id="@+id/frame"
android:orientation="vertical" android:layout_width="wrap_content"
android:layout_height="wrap_content"
android:measureAllChildren="true"
>
<ImageView
android:layout_width="wrap_content"
android:layout_height="wrap_content"
android:visibility="gone"
android:src="@drawable/ic_launcher"/>
</FrameLayout>
|
Below is the code of MainActivity.java . Here we have used Toast to display height and width on screen.
public class MainActivity extends Activity {
@Override
protected void onCreate(Bundle savedInstanceState) {
super.onCreate(savedInstanceState);
setContentView(R.layout.demo);
FrameLayout frame=(FrameLayout)findViewById(R.id.frame);
frame.measure(View.MeasureSpec.UNSPECIFIED, View.MeasureSpec.UNSPECIFIED);
int width = frame.getMeasuredWidth();
int height = frame.getMeasuredHeight();
Toast.makeText(getApplicationContext(),"width="+width+" height="+height,Toast.LENGTH_SHORT).show();
}
}
|
When you run the App in Emulator you will see the below output:

Explanation of Example: It measures all the children in the layout. For ex: If we setVisiblity of an view be gone and set measuresAllChildren property to be true, then also it will also count to that view which is not visible, but if we set the measuresAllChildren property to be false, then it will not count to that view which is gone.
Things To Do Yourself: Try changing measuresAllChildren value to false and run the App in Emulator. You will see the output shows 0 width and height of Frame Layout.
Example Of Frame Layout in Android Studio:
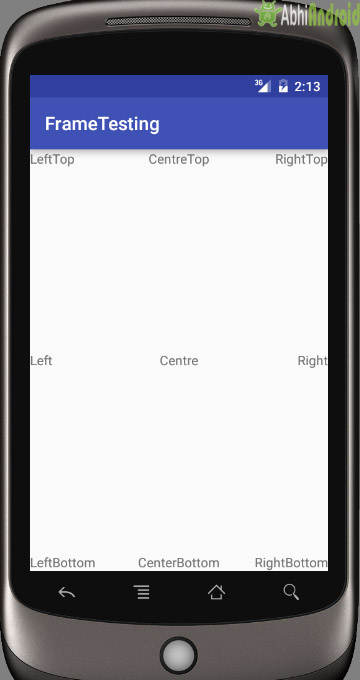
Example 1: Frame Layout using layout gravity. Here we will put textview at different position in Frame Layout. Below is the code and final output:

Step 1: Create a new project in Android Studio and name it FrameTesting. (Select File -> New -> New Project. Fill the forms and click “Finish” button)
Step 2: Now Open res -> layout -> activity_main.xml and add the following code. Here we are putting different TextView in Frame Layout.
<?xml version="1.0" encoding="utf-8"?>
<FrameLayout xmlns:android="http://schemas.android.com/apk/res/android"
android:layout_height="match_parent"
android:layout_width="match_parent"
>
<TextView android:text="LeftTop"
android:layout_width="wrap_content"
android:layout_height="wrap_content" />
<TextView android:layout_height="wrap_content"
android:layout_width="wrap_content"
android:text="RightTop"
android:layout_gravity="top|right" />
<TextView android:layout_height="wrap_content"
android:layout_width="wrap_content"
android:text="CentreTop"
android:layout_gravity="top|center_horizontal" />
<TextView android:text="Left"
android:layout_gravity="left|center_vertical"
android:layout_width="wrap_content"
android:layout_height="wrap_content" />
<TextView android:layout_height="wrap_content"
android:layout_width="wrap_content"
android:text="Right"
android:layout_gravity="right|center_vertical" />
<TextView android:layout_height="wrap_content"
android:layout_width="wrap_content"
android:text="Centre"
android:layout_gravity="center" />
<TextView android:text="LeftBottom"
android:layout_gravity="left|bottom"
android:layout_width="wrap_content"
android:layout_height="wrap_content" />
<TextView android:layout_height="wrap_content"
android:layout_width="wrap_content"
android:text="RightBottom"
android:layout_gravity="right|bottom" />
<TextView android:layout_height="wrap_content"
android:layout_width="wrap_content"
android:text="CenterBottom"
android:layout_gravity="center|bottom" />
</FrameLayout>
|
Step 3: Let the MainActivity.java has default Android code or add the below code:
package abhiandroid.com.frametesting;
import android.support.v7.app.AppCompatActivity;
import android.os.Bundle;
public class MainActivity extends AppCompatActivity {
@Override
protected void onCreate(Bundle savedInstanceState) {
super.onCreate(savedInstanceState);
setContentView(R.layout.activity_main);
}
}
|
Output:
Run the App in Emulator, you will see Textview positioned at various position in FrameLayout


.png)


0 Comments:
Post a Comment