
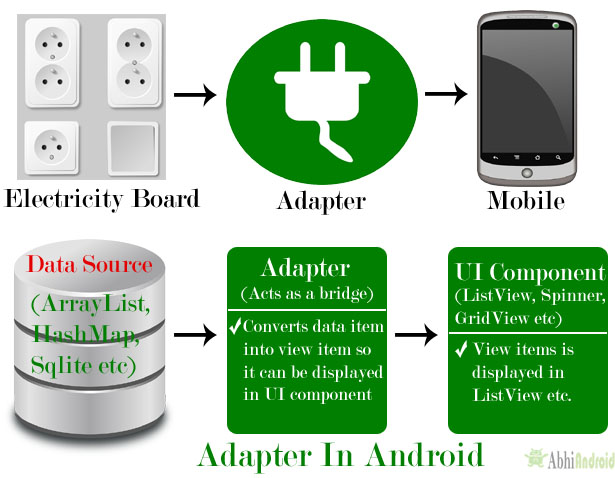
In Android, Adapter is a bridge between UI component and data source that helps us to fill data in UI component. It holds the data and send the data to an Adapter view then view can takes the data from the adapter view and shows the data on different views like as ListView, GridView, Spinner etc. For more customization in Views we uses the base adapter or custom adapters.
To fill data in a list or a grid we need to implement Adapter. Adapters acts like a bridge between UI component and data source. Here data source is the source from where we get the data and UI components are list or grid items in which we want to display that data.
Below is a conceptual diagram of Adapter:
Adapters In Android:
There are the some commonly used Adapter in Android used to fill the data in the UI components.
BaseAdapter – It is parent adapter for all other adapters
ArrayAdapter – It is used whenever we have a list of single items which is backed by an array
Custom ArrayAdapter – It is used whenever we need to display a custom list
SimpleAdapter – It is an easy adapter to map static data to views defined in your XML file
Custom SimpleAdapter – It is used whenever we need to display a customized list and needed to access the child items of the list or grid
Now we describe each Adapters one by one in detail:
1. BaseAdapter In Android:
BaseAdapter is a common base class of a general implementation of an Adapter that can be used in ListView, GridView, Spinner etc. Whenever we need a customized list in a ListView or customized grids in a GridView we create our own adapter and extend base adapter in that. Base Adapter can be extended to create a custom Adapter for displaying a custom list item. ArrayAdapter is also an implementation of BaseAdapter.
Custom Adapter code which extends the BaseAdapter in that:
public class CustomAdapter extends BaseAdapter {
@Override
public int getCount() {
return 0;
}
@Override
public Object getItem(int i) {
return null;
}
@Override
public long getItemId(int i) {
return 0;
}
@Override
public View getView(int i, View view, ViewGroup viewGroup) {
return null;
}
|
In above code snippet we see the overrided functions of BaseAdapter which are used to set the data in a list, grid or a spinner. These functions are described in BaseAdapter tutorial with example.
2. ArrayAdapter In Android:
Whenever we have a list of single items which is backed by an Array, we can use ArrayAdapter. For instance, list of phone contacts, countries or names.
Here is how android ArrayAdapter looks :
ArrayAdapter(Context context, int resource, int textViewResourceId, T[] objects)
|
The above function are described in ArrayAdapter tutorial with example.
3. Custom ArrayAdapter In Android:
ArrayAdapter is also an implementation of BaseAdapter, so if we want more customization then we can create a custom adapter and extend ArrayAdapter in that. Since array adapter is an implementation of BaseAdapter, so we can override all the function’s of BaseAdapter in our custom adapter.
Below Custom adapter class MyAdapter extends ArrayAdapter in that:
public class MyAdapter extends ArrayAdapter {
public MyAdapter(Context context, int resource, int textViewResourceId, List objects) {
super(context, resource, textViewResourceId, objects);
}
@Override
public int getCount() {
return super.getCount();
}
@Override
public View getView(int position, View convertView, ViewGroup parent) {
return super.getView(position, convertView, parent);
}
}
|
These functions are described in Custom ArrayAdapter tutorial with example.
4. SimpleAdapter In Android:
In Android SimpleAdapter is an easy Adapter to map static data to views defined in an XML file(layout). In Android we can specify the data backing to a list as an ArrayList of Maps(i.e. hashmap or other). Each entry in a ArrayList is corresponding to one row of a list.
The Map contains the data for each row. Here we also specify an XML file(custom list items file) that defines the views which is used to display the row, and a mapping from keys in the Map to specific views.
Whenever we have to create a custom list we need to implement custom adapter. As we discuss earlier ArrayAdapter is used when we have a list of single item’s backed by an Array. So if we need more customization in a ListView or a GridView we need to implement simple adapter.
SimpleAdapter code in Android:
SimpleAdapter (Context context, List<? extends Map<String, ?>> data, int resource, String[] from, int[] to)
|
The above parameters of a simple Adapter is described in SimpleAdapter tutorial with example.
5. Custom SimpleAdapter In Android:
Whenever we have to create a custom list we need to implement custom adapter. As we discuss earlier ArrayAdapter is used when we have a list of single item’s backed by an Array. So if we need customization in a ListView or a GridView we need to implement simple Adapter but when we need more customization in list or grid items where we have many view’s in a list item and then we have to perform any event like click or any other event to a particular view then we need to implement a custom adapter who fulfills our requirement’s and quite easy to be implemented.
BaseAdapter is the parent adapter for all other adapters so if we extends a SimpleAdapter then we can also override the base adapter’s function in that class.
Important Note: We can’t perform events like click and other event on child item of a list or grid but if we have some requirements to do that then we can create our own custom adapter and extends the simple adapter in that.
Custom Adapter extends SimpleAdapter in that:
public class CustomAdapter extends SimpleAdapter {
public CustomAdapter(Context context, List<? extends Map<String, ?>> data, int resource, String[] from, int[] to) {
super(context, data, resource, from, to);
}
@Override
public View getView(int position, View convertView, ViewGroup parent) {
return super.getView(position, convertView, parent);
}
@Override
public int getCount() {
return super.getCount();
}
}
|
The above overrided functions of simple adapter are already described in Custom SimpleAdapter article.
Adapter Example In Android Studio:
Below is the Android Studio example which show the use of the Adapter in Android. In this example we display a list of fruits names with images by using SimpleAdapter and whenever user click on a list item the fruit’s name displayed in a Toast.
Below you can download complete Android Studio code, see final output and read step by step explanation:

Step 1: Create a new project and name it SimpleAdapterExample.
Step 2: Open res -> layout -> xml (or) main.xml and add following code :
In this step we open an xml file and add the code for displaying a ListView by using its different attributes.
<RelativeLayout xmlns:android="http://schemas.android.com/apk/res/android"
xmlns:tools="http://schemas.android.com/tools"
android:layout_width="match_parent"
android:layout_height="match_parent"
tools:context=".MainActivity">
<ListView
android:id="@+id/simpleListView"
android:layout_width="match_parent"
android:layout_height="wrap_content"
android:divider="#000"
android:dividerHeight="2dp"
android:listSelector="#600"/>
</RelativeLayout>
|
Step 3: Save fruit images in drawable folder with name apple, banana, litchi, mango and pineapple.
Step 4: Open src -> package -> MainActivity.java
In this step we add the code for initiate ListView and set the data in the list. In this firstly we create two arrays first for fruit names and second for fruits images and then set the data in the ListView using SimpleAdapter.
package example.abhiandriod.simpleadapterexample;
import android.support.v7.app.AppCompatActivity;
import android.os.Bundle;
import android.view.Menu;
import android.view.MenuItem;
import android.view.View;
import android.widget.AdapterView;
import android.widget.ListView;
import android.widget.SimpleAdapter;
import android.widget.Toast;
import java.util.ArrayList;
import java.util.HashMap;
public class MainActivity extends AppCompatActivity {
//initialize view's
ListView simpleListView;
String[] fruitsNames = {"Apple", "Banana", "Litchi", "Mango", "PineApple"};
//fruit names array
int[] fruitsImages = {R.drawable.apple, R.drawable.banana, R.drawable.litchi, R.drawable.mango, R.drawable.pineapple};//fruits images
@Override
protected void onCreate(Bundle savedInstanceState) {
super.onCreate(savedInstanceState);
setContentView(R.layout.activity_main);
simpleListView=(ListView)findViewById(R.id.simpleListView);
ArrayList<HashMap<String,String>> arrayList=new ArrayList<>();
for (int i=0;i<fruitsNames.length;i++)
{
HashMap<String,String> hashMap=new HashMap<>();
//create a hashmap to store the data in key value pair
hashMap.put("name",fruitsNames[i]);
hashMap.put("image",fruitsImages[i]+"");
arrayList.add(hashMap);//add the hashmap into arrayList
}
String[] from={"name","image"};//string array
int[] to={R.id.textView,R.id.imageView};//int array of views id's
SimpleAdapter simpleAdapter=new SimpleAdapter(this,arrayList,R.layout.list_view_items,from,to);
//Create object and set the parameters for simpleAdapter
simpleListView.setAdapter(simpleAdapter);//sets the adapter for listView
//perform listView item click event
simpleListView.setOnItemClickListener(new AdapterView.OnItemClickListener() {
@Override
public void onItemClick(AdapterView<?> adapterView, View view, int i, long l) {
Toast.makeText(getApplicationContext(),fruitsNames[i],Toast.LENGTH_LONG).show();
//show the selected image in toast according to position
}
});
}
}
|
Step 5: Create new layout-> rec-> layout-> list_view_items.xml and add following code:
In this step we create a xml file for displaying ListView items. In this xml we add the code for displaying a ImageView and a TextView.
<?xml version="1.0" encoding="utf-8"?>
<RelativeLayout xmlns:android="http://schemas.android.com/apk/res/android"
android:layout_width="match_parent"
android:layout_height="wrap_content"
android:background="#fff">
<ImageView
android:id="@+id/imageView"
android:layout_width="50dp"
android:layout_height="50dp"
android:padding="5dp"
android:layout_alignParentRight="true"
android:layout_marginRight="10dp"
android:src="@drawable/ic_launcher" />
<TextView
android:id="@+id/textView"
android:layout_width="wrap_content"
android:layout_height="wrap_content"
android:padding="@dimen/activity_horizontal_margin"
android:text="Demo"
android:textColor="#000" />
</RelativeLayout>
|
Output:
Now run the App and you will different fruit names listed in ListView. Here we used Simple Adapter to fill data in ListView.


.png)


0 Comments:
Post a Comment